Interstate Diagram Print Sample!

First print sample of my Interstate Diagram poster came in today. This one is from an online on-demand printer - I love the size (36" x 24"), and the colors look great as well, nice and bright! I could even make the type a little bit smaller at this reproduction size, which could neaten things up a bit. Still waiting on a couple of different printers before I make a final decision on which way to go.

Prints will be for sale soon - let me know if you're interested by emailing camgbooth -AT- gmail -DOT- com!

UPDATE: Posters - in both 25" x 17" and 36" x 24" sizes - are now available for purchase here.

Eisenhower and H.C. Beck's Love Child

UPDATE: Prints of this diagram are now available for sale here.

Here's the result of my latest "designing stuff because I feel like it" phase: a map of America's comprehensive Interstate highway system in the form of a metro or subway map.

I came across a very different take of this on the internet last week, an incredibly simplified, very rectangular (and very orange!) diagram by Chris Yates. Many viewers of this map were calling it a "Beck style map" (after H.C. Beck, the originator of the London Underground Diagram) or a "subway style map", but on the whole, I disagreed with that point of view.

The best examples of subway maps use strong colour codes for separate lines and a clear hierarchy of detail (interchanges, major stations, minor stations, etc.) to convey a lot of information rapidly and clearly. And while there is some degree of geographical distortion in most metro maps (the centre of London in Beck's diagram is greatly enlarged compared to the outer suburbs), there should always be an underlying sense of the relationship between destinations in reality and on the map.

So that's what I set out to create - a simplified diagram of the Interstate system in the style of the best transport diagrams. Armed with Google Earth, Google Maps, Wikipedia, a gridded pad of paper and pen, Adobe Illustrator CS3, Chris Yates' map and another excellent map by Rebecca Brown that I found on Flickr, I began my Herculean task.

Early on, I decided that the "major" highways (those divisible by 5) would form the framework of my diagram. These would be thicker of line than the minor roads, and would be distinctively colour coded. Their termini would also be called out in a bolder fashion than the other roads. This was done relatively painlessly, with very little rejigging required to make all the major intersections line up. I was surprised at how much this simple grid already looked like America's borders, which gave me great hope that things were going to work out well.

Then it was onto fitting the minor highways into this grid. Even though these roads don't have specific colour codes, I strove to give some extra information in the shades of grey used: a darker gray was used for even-numbered roads (running from west to east; lower numbers to the south, higher numbers to the north) and a lighter grey for the odd-numbered roads (running from north to south; lower numbers to the west, higher numbers to the east). Each road has its number marked at each terminus, with a full key at the bottom of the map for cross-reference. A bit of tweaking was required here and there to make every road and name fit neatly (it gets a bit crowded in the eastern states!), but in general everything worked out beautifully. I even managed to show concurrency of Interstates by running the "lines" next to each other, just as they do on subway maps.

Then I added the Great Lakes, coastline, borders and the key. Done!

All up, this project took around a week to complete. There's still some little tweaks and fixes to make, and I feel sure that road aficionados across the country will be only too ready to point out my errors as time goes by, but overall, I'm extremely happy with the way it turned out!

Some oddities: I-99 breaks the grid by being placed to the WEST of I-95. Apparently, the number was written into Section 332 of the National Highway Designation Act of 1995 by Bud Shuster, then-chair of the U.S. House Committee on Transportation and Infrastructure, the bill's sponsor, and the representative of the district through which the highway runs. Why? Maybe he thought 99 was a cool number for his local highway?

I-97 is to the east of I-95 (as it should be), but it is the only Interstate that does not intersect with any other. In fact, all of I-97 lies in one little county just outside Baltimore.

Oh, and here's a direct link to a much BIGGER version (more pixels than can fit on your screen!)

A Tale Of Two Cities (Bicycle Edition)


Bike Culture, originally uploaded by Senex Prime.

Here in PDX we think we've got it pretty good when it comes to commuting by bicycle. After all, Portland is far and away the best city in the US for biking. It's compact, (relatively) flat and easy to navigate (hurrah for the grid system). There's also an increasing amount of infrastructure at very little cost to the taxpayer: bike lanes, special signals at intersections, lots and lots of bike only parking... yep, things are good in Bike City USA.

That is, until you visit Amsterdam and see how things really should be. Bikes are absolutely everywhere and the amount of infrastructure to support and encourage bike use is simply amazing. Bike lanes thread their way through most of the city, often separated from the main roadway by a median, always coloured red to signify them clearly. Traffic lights almost always have bike signals on them and everyone gives way to bikes as a matter of course. The main railway station - Amsterdam Centraal - has a multi-level parking lot for 2,500 bicycles and there are secure and patrolled lots dotted throughout the city as well.

The other thing that's really different is the complete lack of bike snobbery and one-upmanship that is prevalent in Portland. Hardly anyone rides a fancy 21-speed Bianchi or a Cannondale with titanium forks, nor are there any hipster fixed-gear bikes. Instead, everyone rides big, clunky, black bikes with just enough gears to get you over the steepest bridge in town, barely functional brakes, a kickstand, fat fenders and a chain guard (hence no one in Amsterdam has to roll their right trouser leg up to save it from being ripped by the front gear sprocket, the sign of a hardened Portland cyclist). These are commuting bikes, make no mistake about it. And because everyone's bikes are so similar (black, old, dented), theft also seems to be much less of a problem - most people use a simple chain to secure their bike instead of super-hardened whiz-bang Kryptonite locks that are required here if you want to see your ride again.

Also not to be seen: that old Portland favourite, the cute little tricycle baby cart that trundles along behind your bike. Babies sit in little "car seats" mounted on the handle bars, while older children just climb on behind their parents and hang on. Older people give friends lifts on their bikes just about everywhere; we often saw women wearing incredibly chic outfits perched side-saddle on the back of a bike as it whizzed by.

Things aren't perfect in Amsterdam, though - a huge amount of tourists hire bikes every day and ride around as if they're immune to the very real dangers of the road, seemingly thinking that Amsterdam is Disneyland and they're on the latest theme ride. I saw countless numbers of people get their tyres caught in tram tracks and just have a general lack of awareness that put them in danger. However, drivers in Amsterdam all seem to have a great awareness of cyclists (probably because they're so omnipresent), and this lessens the risks somewhat.

In the end, the main proof of the difference between the two "bike cities" lies in the statistics. Portland's bicycle commute rate (ie, to and from work) just hit 6.5%, up from 4.0% a couple of years ago. Amsterdam's lies at around 40%, a truly staggering number.

One Last Flaming Hoop: Addendum

Sighhhh.

Why are things never easy when it comes to dealing with the government? Christine and I returned from our European sojourn (more on that soon!) to find that my I-751 application had been returned to me in our absence.

Why?

Because it arrived at the processing centre on the 18th of September, which is 91 days before my Green Card runs out. And you have to send them the application within the 90 days preceding the expiration date. That's right, it got there one whole day early, so they packed the whole thing up and sent it back to me.

The really funny thing? The date stamped on the included cover letter which explained why the application had been returned was the 21st of September, which is well within the 90 day window. Ah, stubborn bureaucracy at its finest!

One Last Flaming Hoop!

The records of this Service indicate that you entered the United States as a conditional permanent resident on 12/18/2007. In accordance with Section 216 of the Immigration and Nationality Act you must file Form I-751, Petition to Remove Conditions on Residence. Failure to do so may result in the automatic termination of your Status. You can obtain Form I-751, as well as filing information and fees, from www.uscis.gov or call 1-800-375-5283.

With this tersely worded letter, the final part of my immigration to the United States has begun. It's hard to believe that something that was set in motion back in 2006 will finally come to an end at the end of 2009 (or, more likely, some way into 2010 if the usual processing speed of the USCIS comes into play).

Because I entered the US on a fiance Visa, then got married to claim residency, the US Government basically doesn't trust me an inch. They've seen every single marriage trick and scam in the book, and in their eyes, we're all suspicious until proven otherwise. The first Green Card you get when you enter the country is only valid for two years instead of the usual ten (because they don't trust you), and you must start to renew it within 90 days of its expiration, or you get booted unceremoniously from the US.

To renew it, we have to send in yet more evidence that our relationship is a bona fide marriage – joint bank account statements, lease notices, photos, notarised affidavits from friends, that kind of stuff. Oh, and another $500-odd for the processing fee and yet another set of fingerprints... this'll be the third time! But really, it's one of the simpler tasks we've had to complete on this long road, so I can't foresee too many problems. And then... freedom!

We've been married for two years!


Thanks to all for your warm wishes and support!
Cam and I have had such a blast this past year and it all has been going by so fast! This coming year brings us into a realm of real security and comfort as Cam establishes work in America and we start going on trips together such as Amsterdam coming up in 6 weeks! With him having steady work and me getting done paying medical bills, we know that this year will have a lot of good times in store. We had a lot to celebrate and last night we went to Rocky Butte where we were married back in our youth and had a picnic of bread, exotic cheese and local wine. If my foot was in good order, I would have brought the trampolines. But we did bring the space helmets, of course, for photographic moments!


Golden Gate


Golden, Golden Gate, originally uploaded by Senex Prime.

Well, I'm back from my little jaunt down to San Francisco. Even though I worked hard (staying in the office until 10:30pm the night before the presentation), I did manage to get out and about and play the tourist a bit.

Here's my favourite shot so far – the always impressive Golden Gate Bridge (coincidentally, the subject of the presentation) as seen from Pier 39 at Fisherman's Wharf. The place is way too touristy, but it does offer spectacular views of the bay, especially at sunset!

More soon!

Seriously, its getting too geeky on here. I need to fill this space with some gore! It hasn't been all puppy dog tails over here. Cam has been working REALLY hard with a full time job and taking care of my crippled self. Tomorrow he is off to the great land of San Francisco to do amazing things and move ahead in the world. Me, on the other hand has just managed to make Mac and Cheese by myself without toppling over and calling 911. No but really, I am doing ok these days and I have my fingers crossed that two weeks from now, my doctor will give me good news like "go ahead and walk out of this office."
For the last two months, it has been a bit of a hardship and I have been sitting around a lot but Cam and I have gotten out and done all sorts of crazy stuff that normal people with broken ankles don't do.
Lets take work for example. For a month now, I have been helping the masses in a wheelchair with a laptop on my lap where I can sort out all their needs on the spot. It's been very gratifying for me and my customers to not have to stand behind a counter, stare each other down or print out giant receipts for them to sign. I take credit cards wirelessly and send them invoices via email and most people are "impressed" by my abilities although it is nothing special. It's how I get by. In reality, its just pure laziness on my part. One gentleman told me the other day that he was "glad the store hired people like me" and quickly backed it by saying "my happiness was pleasant to work with." Yeah, yeah. I do feel like people treat my like they have just entered a Goodwill sometimes, smiling instantly down on me when they came in with a frown. I can't say the wheelchair has hurt sales. I actually think business is doing better.
Outside of the store, the wheelchair has been a novelty. I can sit down in long lines. Women in heels run to get the door for me. People in coffee shops offer help when I am just sitting quietly by myself waiting for Cam. I think I have renewed hope for the human race at this point. Everyone loves to be a hero helping someone who "looks" like they are in need.
Everyone has hurt themselves this summer. As we rolled around town yesterday observing the Blues Fest by the waterfront, I was counting the casts, crutches and fellow wheelchairs go by. I used to think it was a heightened sensitivity, but I am pretty sure now there is no mistake, people are getting out there and slamming themselves. Can't blame them, this summer has been gorgeous. We have been able to go on a road trip, camping, festivals, concerts, or just out for drinks as if my hinderance were nothing more than a skin rash.
Other than my new profound outlook on life, let it be known that its going to be an exciting week of Christine's Birthday Festivus! With the bad leg and all, the video project of everyone dressed up as dinosaurs in the forest will be postponed to another date. I might just be up for sitting around in good company with a cold beer in my hand on a hot summer evening. Oh and Im sure Cam has some sort of crazy party in space planned for me *wink wink* right darling??

Star Trails!

Last weekend, Christine and I headed on out to Homedale, Idaho to attend Water on the Ditch, the annual party/jam session thrown by some of our good friends each year. As always when travelling, I took my camera with me, but I wanted to make sure I tried some new things out. Because always taking the same kind of shot gets boring, y'know?

The one type of photography you simply can't do in Portland is star trails; the light pollution from the city simply outshines the faint imprints left by the stars. I did try some when Christine and I camped out in Central Oregon (now forever known as "The Ankle Trip"), but I obviously wasn't thinking straight and shot at ISO400, adding so much noise to the shot as to render it useless.

So I tried a shot on both nights. The first one was okay, but nothing special. However, the second night's shot turned out perfectly:

Stars Over The Ditch

This is an hour long exposure facing almost directly north. The camera settings were ISO100 at ƒ/8, 17mm focal length. A lot of people suggest opening the aperture all the way up, but I was concerned that doing this would totally blow out the foreground detail (which I was hoping would be the best part of the shot), so I closed it up a few stops. Of course, the camera was mounted on a sturdy tripod and the exposure was started and ended with a cable release. I had the long exposure noise reduction option in the camera set to "On", but I have since read that you shouldn't really bother with this, as post-production noise-reduction in Photoshop or via a plug-in like Noise Ninja will always produce a better effect.

I really am amazed this turned out so well. The foreground is everything I could have hoped for and then more. The light from the stage on the trees surrounding the house is quite magical, and there are lots of little details from lights that went on and off during the exposure as well: someone walking with a flashlight, headlights from a car turning into the property, camera flashes and so on.

Post-production was limited to noise reduction (it still needed it, although not to a huge degree), cloning out some dead or hot pixels in the image and then adding some extra saturation/brightness to the colors. It prints beautifully at 13"x19" on our Canon Pixma Pro 9000 and we plan on giving one to our friends who host the Ditch each year as a token of our appreciation for this most excellent of parties!

The more we get out of the city, the more of these I'm going to take... I can only get better with experience!

Cleaning my camera sensor!

The one major, major flaw in older digital SLR cameras like my Canon Rebel XT (that's a 350D for those outside the US) is that they are dust magnets. Changing lenses or even using the zoom on a telephoto lens seems to positively suck dust and dirt inside the camera, where it sticks to the mirror, the focusing screen, and – worst of all – the sensor array itself.

Newer DLSRs have fancy vibrating ultra-sonic cleaning mechanisms that can shake dust loose from the inner workings of the camera, mine does not. As a result, my nearly 3-and-a-half year old camera was becoming something of an embarrassment... clear blue skies were covered in dust spots that had to be cloned out in Lightroom or Photoshop, and any shot stopped down below ƒ/16 was absolutely covered in horrid little black dots as the dust was brought more into focus. I'm using a tripod, stopping down and doing a lot more long exposure photography these days, all of which are guaranteed to show off those spots in all their unsightly glory. After our trip to Central Oregon last month, these spots crossed the line from "slightly annoying" to "I can't stand these damn dust bunnies!"

So what to do? I could just take my camera into a pro photo store and have them clean the sensor, but there were many reports on the web of cameras returning from service either exactly the same or worse than when they went in. That sounds like $60 poorly spent to me. So I decided to look into self-cleaning solutions, as scary as that sounds! Again and again, the same name kept coming up: Copper Hill Images. Their website posts the most detailed instructions on cleaning the interior of a digital camera I have ever seen, and they sell the kits that give you the tools to do it as well. So, after reading and rereading the site and other people's opinions of the method, I went ahead and ordered a kit. It arrived yesterday, and I have spent the morning giving my camera a thorough, well-overdue cleaning. How did it go? I think pictures tell the story. These are shots of my computer monitor with a sky-blue image filling the whole screen (the dust is always more visible against the sky in real-life, so that's what I set out to simulate on another grey Portland day!). The aperture was set to ƒ/22 for all these shots to bring the dust into focus as much as possible.

First up, a shot taken before any cleaning:

Disgusting, eh? There must be over 100 individual spots here, including some really big ones. This is what comes from changing lenses out in the open and rarely cleaning your camera!

After taking each shot, I brought them into Photoshop and ran Auto Levels (Command-Shift-L) on a duplicate layer of the image. This allowed me to really see each and every dust bunny on the image, which I've circled in red.

My first step was to get the SensorSweep brush, give it a light static charge by blowing air on it from a blower and lightly – oh so lightly! – brush it over the sensor to remove any loose dust particles. This done, I took another test shot:

A huge improvement already! You can see that the large spot has moved because I used a different focal length to take this shot compared to the last shot - indicating that this one is on my lens or filter, not the sensor.

Next, I thoroughly cleaned all my lenses and filters with the brush followed by lens tissue moistened with optics cleaner. Getting there! Now for the final, most daunting step... wet cleaning the sensor itself. This uses lint-free photographic wipes moistened with a drop or two of Eclipse optic fluid, carefully wrapped around a little stylus to do the job. With a steady, light hand, you brush the wipe across the sensor one way and then back the other, using one side for the first stroke, then the other side for the second stroke. Whatever you do, don't go back in and do another wipe after this - you'll just end up depositing all the removed dirt back on the sensor array!

And the result:

Still not perfect, but what an improvement over the "Before" photo! The big spot still seems to be on my lens – I'll have to investigate its exact location further – but we're down to a handful of dust spots on the sensor. Hopefully, with regular cleaning sessions, I can continue to reduce this number even further!

I am already very impressed with this method of cleaning, but it's certainly not for everyone. If you have poor eyesight, unsteady hands or are terrified of damaging your camera, then I would recommend that you look into alternative methods instead!

More images selected for Getty Images' Flickr Collection!

Yay! Getty have selected five more of my photos for inclusion in the Getty Images Flickr Collection! While it's true that I haven't made a sale yet through this system, I feel that that Getty is capable of reaching a much larger audience than I ever could, and eventually I'll reap the benefits. These are the photos they've chosen this time around:

Fire: this is a simple little shot of a bonfire that I took at a party last December - the high shutter speed (1/1250th of a second) does a good job of freezing the licking flames in time.

Nom Nom Nom: This is one of our pet gerbils enjoyig a little snack in her cage, taken with my 70-300mm lens from a distance. I really like the shallow depth of field in this, which - for once! - has focussed on exactly the right place.

Folds II: One of my abstract shots from the Painted Hills in Central Oregon. I'm ecstatic that they've chosen one of these, because they really are one of my favorite series of photos.

Washington Bound: A shot taken from the passenger seat of our car as we drove across the Astoria Bridge from Oregon to Washington. I've always really liked this shot because of the combination of sharp detail, motion blur and even the rain on the windscreen.

Lunar Eclipse, 20th February 2008: Yes, yes, yes! If this isn't a saleable image, then I don't know what is! I put a huge amount of work into this composite image, and I really think it shows.

Interestingly, the last two images are being marketed as Rights Managed shots, rather than the more usual royalty-free model. This means that each and every use of the image by a client is negotiated separately, and often for more money per use... we shall see what that brings!

The titles of each image above links to the relevant photo in my Flickr stream. See also my previous post about the first images chosen by Getty Images.

P.S. Getty also just sent me an email saying that I'm allowed to choose five images that I would like to send to them for inclusion in the collection, and I'm somewhat stumped so far. Any ideas?

First camping trip of the season!

The best – the absolute best – thing about having our own car is that we can get out of Portland on a whim and go Elsewhere. For once, Christine and I both had the same two days off (Sunday and Monday), so we decided to head out to Central Oregon to see the high desert sights.

We decided to camp at the Cove Palisades State Park, simply because it had the best facilities. I had originally wanted to stay at Smith Rock State Park – an area that looks absolutely stunning in photos I have seen – but their camping facilities were limited to a bivouac area with a pit toilet and no open fires allowed (due to the sensitive nature of the park), and what fun is camping without a roaring campfire and marshmallows at the end of the day?

Because we organised so quickly and changed our preference of campsite so late, we didn't really have much idea of what Cove Palisades would be like... were we in for a pleasant surprise! You can't see much as you approach, but gradually you realise that the high, flat plain is intersected by deep river canyons, well over 1000 feet deep. Further downstream, the gorge has been dammed (for hydro-electric power), filling the canyons with a large lake, upon which boats of all descriptions were enjoying the beautiful weather.

We had arrived too early to check into a campsite, so we hiked from the valley floor to the top of the escarpment for spectacular views over most of the park:

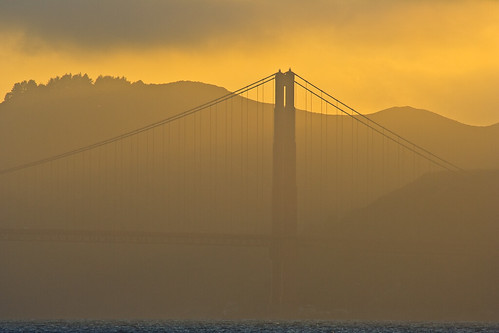
The isolated plateau between the two arms of the lake is known as "The Island", and is one of the last remaining areas of never-farmed grassland left in the United States. As such, it is a vital habitat for eagles and other raptors as well as being an important research site – it is closed to all public access to preserve it. It looks like something from "The Land Time Forgot" to me, and I half expected to see dinosaurs roaming across it. That's Mount Hood you can see way, way off in the distance. This area of Oregon offers the most amazing views of the Cascades mountain range I have yet seen; from Mount Hood in the north all the way down to Mount Bachelor (near the town of Bend) to the south. Here's a shot of some of the mountains that I took on Sunday morning:

To the left is Broken Top (most southerly), followed by the "Three Sisters"; South Sister, Middle Sister (almost obscured) and North Sister, also known (apparently) as Faith, Hope and Charity. In the foreground, you can see more of the spectacular gorges of the Cove Palisades State Park.

However, our trip was not all fun, games and awesome photos. Late on Saturday, we were at a fun little beach within the park to take some photos of what promised to be a beautiful sunset. Christine ventured out along a pier and onto some floating pontoons that eventually joined back on to another wooden dock at the other end of the beach. The gap here was wider than the first gap, but Christine was confident that she could jump it, rather than having to walk all the way back along the pontoons to the first pier. I decided to take a photo of her leap...

... which turned out spectacularly well, but unfortunately the jump itself didn't end quite so happily. Christine's left foot slipped on the wet wooden dock, and when her right foot tried to compensate, it got bent in the wrong direction, causing a horrific sprain in her right ankle. However, we didn't know this at first, as the initial pain was in her shin. Thinking she'd just grazed her shin and that she'd be fine after the initial pain died down, we sat around for a while, telling concerned onlookers that we'd be alright in a minute.

However, when Christine tried to stand, the real injury became apparent and its serious nature sunk in. Christine was in immense pain with every little movement of her ankle, and I had to enlist the aid of a nearby burly gentleman to help me carry her back to the car park. We headed back to the campsite and got directions to the nearest hospital, which was in the nearby town of Madras. We set off on our way, with me trying to drive both quickly and smoothly at the same time, as every bump in the road caused Christine excruciating pain. Finally, after what seemed an eternity, we arrived at the little hospital and checked Christine in. After an interminable check-in process ("Do you have a religious preference?" was one of the questions!), Christine was attended to. X-Rays confirmed no break, just a serious sprain and we were soon on our way, with Christine's ankle safely held in an air cast,armed with painkillers and a pair of crutches, which the hospital were very reluctant to give her until they realised she had insurance!

Remarkably, we went back to the campsite (which we had set up earlier in the day) and camped out as intended... although we arrived back at camp after 10:30! On Sunday, we drove down to Bend and had lunch at the excellent Deschutes Brewery and Public House before returning to Portland in the afternoon. Quite the adventure!

Driving a point home (pardon the pun!)

Nothing makes you realise just how darn fat you were more than some good old fashioned before and after photos... and I've got some of the best, thanks to the DMV. The one on the left is from my instructional permit, and was taken on November 20th last year, when I was probably at my portliest. The one on the right is from my new Oregon Driver's Licence, taken last Tuesday.

Freakin' scary.

Now I can drive on BOTH sides of the road!

So I finally got off my butt and went and got myself an Oregon Driver's License today. I just realised that there was no reason not to get it apart from procrastination. While procrastination can be fun, it was time to join the real world... so at 8am in the morning, Christine and I headed off to the grandly titled Portland Drive Test Center... really just a ginormous DMV.

For some reason, this is the only DMV office in the entire Portland metropolitan area where you can actually do the drive test... totally unlike Sydney, where every RTA (Roads and Traffic Authority) office does it.

Anyway, of all the hoops I've had to jump through in my quest to lead an American Life™, this was probably the easiest of all. Sign in, fill out some paperwork, show my Green Card, pay the test fee of $9 and then go for a drive. The tester was a pretty relaxed guy and I really didn't feel nervous at all. And drive tests don't really agree with me – I failed back in Australia five times before I got my license. I kept getting the same drive tester, and for some reason, he just didn't like me and failed me for more and more ridiculous reasons each time. On the sixth time, I got someone else, and – surprise, surprise – I passed!

So I made a couple of little mistakes in the test – I stopped too far into the intersection at a couple of stop signs (a matter of inches!), and turned into the middle lane when turning left into a multi-lane one way street (you have to turn into the left-most lane). Nowhere near enough to fail me, anyway! I was slightly annoyed that after diligently practicing reverse parks all week, I didn't actually need to perform one in the test – I just had to pull in to an empty curb as if parking, and then reverse two car lengths in a smooth manner. No other cars anywhere near me!

Back at the DMV, I paid my $59 for an eight-year license (showing my Green Card again), and then had my photo taken by another staff member for my license (third time for the Green Card!), which will be mailed to me in the next week or so.

Road trip, anyone?

Graphic designer: the amazing job-absorbing career

Over the last few weeks, I've been filling in my non-working time (of which there's been a little too much lately, unfortunately) by teaching myself CSS (Cascading Style Sheet) design for the web. It's a necessary skill to have as a designer these days, as table-based layouts are very much frowned upon these days. CSS basically helps to separate the content of a site from its style (the way it looks), which makes future design changes and updates easier - in theory! Of course, there's all sorts of little hacks and workarounds that you have to know to make your code work with all browsers, some of which are surprisingly non-standards compliant (I'm looking at you, Internet Explorer!).

As I set about my task, it occurred to me that modern graphic designers probably have a higher skill set and have absorbed more jobs than any other job out there. Let me explain...

When I started as a designer over 15 years ago, computers were just starting to gain a foothold in the industry. They were used to create black and white "keyline" artwork that was output by a high-resolution imagesetter, then mounted on board and painstakingly marked up by hand with instructions for the film house. I've lost count of the number of times that I had to write something like, "Enlarge transparency #3 120%, strip transparency to keyline, delete keyline" on the overlay sheet for a piece of artwork - just to get one picture at the right size in the right place. And everything was defined like this: colours, pictures, fills, gradients. In its way, this was the CSS of the day – instructions that gave style to the basic wireframe of the black and white artwork.

Back then, you trusted the film house to interpret these instructions and produce an output that could be used by the printers to make plates for the final printing. But as computers got more powerful and software more sophisticated, more and more work began to be done by the designer, rather than the film house. Files began to be produced with all the colour information and images already included, moving far more of the creative process directly into the designer's hands. In effect, graphic designers started to absorb what was traditionally the role of the film house. They still scanned images and produced the film and proof for printing, but all of the "magic" they used to do was now in our hands. Move forward to now, and film houses all but extinct – artwork now goes directly from designer to printer, where printing plates are made directly from the digital file.

Much the same happened with image retouching. Once Photoshop entered the market, expensive and wizardly "systems work" began to be done by (the much cheaper) inhouse staff, sometimes disastrously, sometimes very well indeed. There's still no substitute for a professional retoucher, but a lot of designers come very close in most instances, especially on a budget.

Then came the internet revolution and a whole new set of skills for designers – web design. Suddenly designers had to know HTML and Flash, and if they knew how to code, even better. Designers who had worked solely in print suddenly had to think in RGB and in terms of time and animation. Of course, the inverse is also true, because there's a whole generation of young designers out there who started in web design and now produce some of the sloppiest finished art for print that has ever been seen.

So... print designer, web designer, image retoucher, film combiner, coder and often concept developer, illustrator and copy writer as well. Not bad for one job, eh?

Snowboarding fun!

For my birthday this year, Christine decided to treat me to a day of snowboarding up at Timberline Lodge on Mount Hood. We hired some gear and headed up yesterday - cheap lift tickets mid-week made the deal more attractive and the slopes were pretty empty, so it was a good day for a beginner like myself. Christine, who hadn't snowboarded for a few years, jumped straight on her board like it was an old bicycle and was carving up the mountain, no problems at all. And, looking at this photo, you might think that I got the hang of things pretty quickly...

Looks pretty impressive, eh? Unfortunately, this was not the normal position for the day. Most of the time, I looked more like this picture...

Seriously, I lost count of the number of times that I fell flat on my face or butt. Snowboarding is really, really hard, and I just couldn't get the hang of certain necessary techniques, especially the all-important turns that move you from the toe edge of the board to the heel edge. As a result, I spent most of the day on my toe edge: in effect, standing on tippy-toes facing up the hill for extended periods of time. My calves got a thorough stretch, that's for sure!

Every time I'd try to transition to the heel edge (resting on your heels, facing down the hill), I'd lose control and fall down again. And again. And again. A couple of falls were real bell-ringers, as well... I slammed the back of my head hard into the snow a few times (not as soft as it might sound), and winded myself a couple of other times when my arm got caught between the snow and my ribs when I fell. Ouch. Still, everyone says that the first two or three times you go snowboarding, falling down constantly is simply part of the job description, so at least I'm not alone!

One thing I can't fault is Christine's instruction. She was a great teacher all day, even when I was having little temper tantrums... she showed far more patience than I ever thought possible. She laid out all the theory and techniques perfectly, but my body just couldn't turn theory into actuality! However, despite feeling like I have the body of a 90-year old with severe arthritis this morning, I actually had a really good, fun time yesterday and will definitely be back for more.

Just as we were leaving, the thick cloud that had been blanketing Mount Hood all day long suddenly blew away, leaving us with this spectacular view of the mountain to remember the day by. Stunning!

Flickr, Getty Images and me!

Recently, Flickr – the fantastic photo-sharing service and community that I've been using for the last few years – announced that it was entering into partnership with Getty Images, one of the world's foremost stock photography sites. Together, they're working on The Flickr Collection, a library of rights-managed and royalty-free images derived entirely from the millions of photos that are on Flickr.

Over the last few weeks, Flickr and Getty have been sending out emails to select Flickr members, asking them to contribute images for the launch of the collection in March. So I was pretty excited to receive my email on the weekend asking for my participation!

Now, let's just say that I have a lot of experience with stock photography, both as a designer (buyer) and as a seller. Most stock photography sites out there (iStockphoto, Shutterstock, etc.) are what are known as "micro-stock" libraries, where photos are sold extremely cheaply and contributing photographers receive a correspondingly tiny amount of money per image sold. Getty is not one of these sites – it's world wide, almost ubiquitous within the design industry, and sells photos for what they're worth.

I've tried to sell photos through these micro-stock sites before and haven't had any luck at all. Finding and submitting an image that they feel they need and meets all their quality guidelines seems to be almost impossible, and I've usually given up in disgust shortly thereafter. I've had much better luck with people simply finding my photos on Flickr and entering into negotiations directly with me. So, hopefully, this new Getty Collection will take that success and multiply it by Getty's ability to promote their photos... if they actually accept my shots!

Because all I've done so far is upload the images that Getty is interested in to their servers for review. So I still don't know whether they'll accept any of them, but I'm hopeful that at least a few of them will make it through. Then, as the service expands, maybe they'll pick up on some other images hat I think are worthwhile.

In case you're interested, here are the seven images that Getty initially selected for review...

Ampelmann! One of my favourite shots, but I declined to nominate this one for a few reasons. Firstly, I don't have a high-resolution version of this shot (I was new to digital photography when I took this shot and only kept the final, Flickr-sized version of it for some reason), and it also contains copyrighted elements – the Ampelmann itself and the Dorling Kindersley map which it is sitting on.

Houses, Burano: I'm kind of surprised that this was selected, truth be told. It's a nice, colourful shot of an interesting location, but I don't think it's particularly wonderful.

In Space, No One Can Hear You Kiss: I'm also not submitting this one, for the simple fact that I didn't take it! This beautiful shot – of us – was taken at our wedding by Linda, Russ' wife... which kind of precludes me from submitting it as mine!

The Perfect Kiss: Christine and me sharing a smooch. Still deciding whether or not to submit this one... it's a very personal shot, plus the model release forms are a bitch to fill in!

Boats, St. Ives Harbour: This has always been a favourite of mine. I love the gentle curve of the boats as they recede into the distance.

Through The Grass: Another good one! Taken in Yellowstone National Park, I only hope that the quality of this pic is good enough – it was taken with my little Panasonic Lumix point-and-shoot, which only takes 5MP pictures and they tend to be a bit JPG compressy...

Venetian Sunset: One of my most absolute most favourite photos ever! The colour really was like this on the day I took it – from the back deck of a vaporetto returning to Venice from the lagoon islands – and the little Nikon film camera I was using at the time (thanks, Dad!) somehow managed to capture it perfectly!

Winding Path: Paths are obviously in demand at Getty Images! I really like the curving composition and subdued colour palette in this image.

That's it so far! Hopefully some of these will make it through, and then maybe more in the future!

Obama-rama!

At noon Eastern American Time (9:00 in the morning here on the Pacific Coast) yesterday, Barack Obama became the 44th President of the United States of America – a club almost as exclusive as that of Australian Test cricket captain (there are only 42 of them!) and arguably, a job almost as stressful. (Please, I'm joking!)

While I could watch the lead up to the inauguration, seeing the motorcade, the vast throngs of people lining the mall in front of the Capitol and the introduction of all sorts of dignitaries and past presidents, I had to head off to work before Obama made his inaugural speech and was actually sworn in. I did get the pleasure of hearing Dubya booed slightly before "Hail To The Chief" was hurriedly struck up by the band, and – even better – seeing the hateful Dick Cheney wheeled onto the podium in a wheelchair (he hurt his back packing his office!), almost invisible to the crowd – a forgotten man, as he should be.

So I had to wait all day to hear what Obama had to say to the world, but the wait was worth it! Here was a quietly confident new President (one capable of stirring, emotional, riveting speech, rather than one who could barely string a coherulent sentence together) who is well aware of the monumental task ahead of him. His speech was a powerful statement of intent and one that left me in no doubt that his election mantra of "change" was not just bluster. To expect one man to change the world is ridiculous – but at least America now has a President they can be proud of to represent them on the world stage. The sheer number of people who turned up in Washington on Inauguration Day (1.8 to 2 million people!) to wish him well is testament to this, and with that kind of support behind him... who knows what can be accomplished? Hope and belief are very, very positive things in these difficult times, and Obama inspires these ideals more than any other politician in recent memory.

Exercise Update

So it's been almost two months since I started my Nike+ exercise program, and all I can say is that I'm loving it. Each week, I'm getting a little bit faster and running a bit further - my average time taken per mile has gone from 12 and a half minutes to 11. This may seem slow, but my program is slowly building me up to running from walking in a very gentle fashion, probably to stop my body from dying through shock at all this crazy exercise. It's definitely improving my fitness - from barely being able to jog for three minutes without being totally out of breath, I can now run along for 10 minutes without many problems. The best thing is that I definitely look forward to my workouts each day and want to keep doing better every week.